Wednesday, August 28, 2013

Mickey & Minnie Mouse Nails

Today I had the pleasure of doing my friends Summer's nails. She is doing a 10k run this weekend at Disneyland and wanted some Mickey and Minnie nail art! I love how these turned out! Maybe next time I'll venture out and try the faces! lol. Thank you Summer for letting me do your nails. I had a lot of fun!


Minnie Mouse on the left hand.
Colors used: Nicole by Opi "Please Red-cycle", Orly "Liquid Vinyl" and SinfulSHINE "Wisp"


And Mickey Mouse on the right hand.
Colors used: Orly "Glitz & Glamour", Orly "Liquid Vinyl", 
Nicole by Opi "Please Red-cycle" and Serum NO5 "Poppy Fields"


These are so cute! I just love them!
xo, Colleen


Nail Fabulosity Swatches & Review


Today I have some gorgeous polishes from Nail Fabulosity for you! Let's just get right on into it!


FIT FOR A QUEEN
A milky white base with holographic gold hexes and gold microglitters. So stunning! This is two coats on it's own and topcoat. Formula was great!


LITTLE BLUE DRESS - AMPED
Is a GORGEOUS holo thermal! It is a soft blue when warm and purple when cold. It's so amazingly beautiful! This is two coats and topcoat. Formula was amazing. Very smooth.


BUTTERFLY KISSES
Another gorgeous thermal! Pink when warm and purple when cold. It's soft and bold at the same time! Formula on this one was a bit tricky. It pulls a bit if you go over the same stroke in a single application but it ended up leveling out nicely. This is two coats and topcoat.


You can find these beautiful polishes at http://www.etsy.com/shop/nailfabulosity! Also follow @nailfabulosity on Instagram for updates!

xo, Colleen


DISCLAIMER: These polishes were provided to me for the purpose of review. These are my 100% honest opinions. I was not compensated in any way nor am I affiliated with Nail Fabulosity products.

Saturday, August 24, 2013

"Cakespiration" #3!

So while trolling Pinterest I came upon this absolutely gorgeous cake and just had to put it on my nails! If I had this cake I wouldn't want to eat it. I would have it displayed in my house. Haha. Anyways....

This was my first time trying quilted nails! Let me tell you, it is WAY harder than it looks! I think it came out decently good but definitely isn't centered and I pressed too hard in some spots. Definitely need some practice with that one. But besides that, I hope you guys love this as much as I do! And I hope I did this cake justice.

I tried doing a google search for the photo to see where it originated from and who made it so I could credit them but I came up empty :/ Sorry!

I used SinfulSHINE "Wisp" and Essie "Set In Stones" for this entire look!


The cake and my nails :)
I didn't want to do any flowers or bows so I just did a glitter gradient. lol


I really really love this! But I'm gonna keep practicing my quilting :)
xo, Colleen

Thursday, August 22, 2013

Love, Angeline Swatches


Hey pretties! Today I have some more swatches from Love, Angeline! These three polishes are from her white based line awhile back but are currently stocked in her store!!! They're so very pretty!


TEA'LITE
A milky white base with tiny white holo glitter, teal hexes, and white squares. Here is one coat over white and topcoat.


STRAWBERRY FIELDS
A milky white base with light pink and mint green matte hexes. Here is one coat over white and topcoat.


ANCHORS AWAY!
A milky white base with gold and navy hexes. Here is one coat over white and topcoat.


And then I decided to do some art with Anchors Away! So I added some diagonal chevrons. Not sure how I feel about them. I don't think it's for me. Or maybe I need to slant them more? I'll stick to my straight chevrons. Lol. For the chevron I used Lime Crime "Crema De Limon" and Zoya "Ibiza".


All these polishes and so many more beautiful ones can be found at http://loveangeline.bigcartel.com/!!!

xo, Colleen


DISCLAIMER: These polishes were provided to me for the purpose of photo swatches. I was not compensated in any way nor am I affiliated with Love, Angeline products.

Sunday, August 18, 2013

Polka 24/7

Hey guys! And hello to my new followers! First of all, I'm sorry for all the simple looks lately. I have not had any time for detailed nail art! Today I have a simple dotticure but made it a little fun with contrasting colors.

I used Zoya "Jacqueline" as my base and then dotted with Sinful Colors "24/7". I am loving this color combination! Hopefully I will have some fun nail art for you guys next week! But for now enjoy this!


xo, Colleen

Friday, August 16, 2013

Glitter Gradient

Quick post today guys. I was too tired to do any sort of nail art tonight and it took me forever to decide what I wanted to wear!!! I ended up picking Zoya "Blu" and then spiced it up with a glitter gradient using Pure Ice "Never Satisfied". Happy Friday everyone! Too bad it's only my Tuesday, *womp womp* :(


xo, Colleen


Wednesday, August 14, 2013

Love, Angeline Smoke & Mirrors Collection


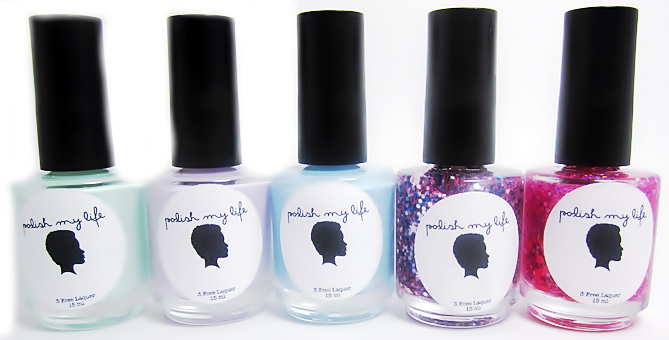
The Smoke & Mirrors Collection from Love, Angeline is a magical themed collection centered around the color grey! It features three grey jellies and three white jellies. They all applied beautifully with no fishing at all. Formulas are amazing! This is a very cohesive collection, from the theme, to the names, to the combinations. Well done!


First up we have....


CARD TRICK
A white jelly base with raspberry, navy, and silver hexes. Reeeally love this one! Here is one coat over white plus topcoat. Great easy coverage of glitters.


TA DA!
A white crelly base with medium pink and hot pink squares, tiny pink holo hexes, and large grey and silver hexes. Here is one coat over white plus topcoat. Another favorite! Also reminds me of a crushed candy cane.


LOVELY ASSISTANT
A white crelly base with matte grey, lavendar, and aqua hexes. Here is one coat over white plus topcoat. Great even coverage.


ABRACADABRA
A grey jelly base with gold dots and purple hexes! I am a sucker for dot glitter. This is stunning. Here is two coats on it's own plus topcoat. Isn't she a beauty!


(please forgive the pink reflection of my camera)


MAGIC CAPE
A grey jelly base with tiny silver and pink holo hexes. Here is two coats on it's own plus topcoat.


HYPNOTIZE
A grey jelly base with fuchsia and teal dots and silver holo hexes. Amazing! Two coats on it's own plus topcoat.


The Smoke & Mirrors Collection launches on August 21!!!! But there may be a possible round two of pre-orders on Friday 8/16! I will update when I know more. Don't miss out, get your hands on these beauties!

Love, Angeline polish can be purchased at http://loveangeline.bigcartel.com/. Make sure to follow Love, Angeline (Natosha) on Instagram @loveangelinepolish for updates!

xo, Colleen


DISCLAIMER: These polishes were provided to me for the purpose of swatch/review. These are my 100% honest opinions. I was not compensated in any way nor am i affiliated with Love, Angeline products.

Glitter Tape Mani

Today I have a really gorgeous look for you! I was inspired by @lafemmelulu on Instagram, most recent mani. She used a tan and gold which was gorgeous but I decided to change it up a little. And hers are 1000x better than mine. She's seriously perfect! Go check her out!

Colors used:
SinfulSHINE - "Wisp"
Sinful Colors - "Soul Mate"
butterLONDON - "Rosie Lee"
Essie - "A Cut Above"


I am also submitting these onto NAIL IT! Magazine for their Nov/Dec issue with the theme being glitter! Wish me luck!

xo, Colleen

BestieTwinNails with @Polishedbytiff!

Back with another installment of #besttwinnails, this time with @polishedbytiff on Instagram!! Go follow her!! We decided on a soft pink & lavender look and made it a little "fancy"!!

Colors used:
Essie - "Fiji"
Rimmel London - "I Lilac You"
Orly - "Dazzle"
Essie - "Set In Stones"


Both of our mani's together


I love how they are similar yet so different! Love ya Tiff!

xo, Colleen

Monday, August 12, 2013

Soft Blue & Coral Polka Dots

Today I have for you a fun dotticure inspired by one of my most favorite nail artists on Instagram...@madicures!!! She's amazing! Her designs are simple but always on point!

Colors used:
Colour Gossip - "Baby Bump"
China Glaze - "Flip Flop Fantasy" (the original)
SinfulSHINE - "Wisp"


I've been getting a little bored with my photos and so I posted a picture on Instagram sometime last week with a new watermark. Not many people liked it so instead I came up with this "logo". I think it was just the change I needed! Who knows how long it'll stick but for now I'm really liking it! What do you guys think?

xo, Colleen

Saturday, August 10, 2013

How To: DIY chevron decals + Neon Overload!

Hi dolls! Today we have a bit of a smorgasbord going on! We've got dots, gradients, glitter, chevron, leopard, zebra! What DON'T we have on these nails! Haha. Well, me and DJ of @djsnails on Instagram teamed up again for #bestietwinnails! While I was in Las Vegas last month I bought us some of the same Island Girl Polishes and when I sent them to her I suggested we do matching nails using them! She basically had full reign on this one! She picked the colors and design and I copied lol.

I used:
Island Girl: "Aloha Girl" "Mohalo Color" and "Sugar Cane" (although I'm pretty sure it's labeled wrong).

Don't worry the decal tutorial is coming! Now usually when I do a chevron design I just paint my base color, let it dry, cut tape, apply it directly to my nail and paint my coordinating color over it then peel it off to reveal the chevron design. But, when I want multiple different colors in my design, that becomes kind of a struggle because if you don't work fast enough with all your colors they start to dry over the tape, then when you peel off your tape your top polishes come right off with it. So then I turn to the Ziploc Method. I did not create this and I have no idea who the originator was.


How To: DIY chevron decals


  1. Paint the color(s) of your choice in big enough sections for however many decals you will need, on a Ziploc (sandwich) baggy and let it dry for a good few hours. Do enough coats so that it is opaque. Here I've done three coats of each color. What I like to do is do it the night before and let it dry overnight. If you need to speed up the process you can also stick it in your fridge and it will dry faster.
  2. When your polish is dry, lift up the edges with tweezers or an orangewood stick. Something pointy that can lift the edges then it should peel right off.
  3. Using your pinking shears or craft scissors, start cutting your strips. You can do them as thin or wide as you want. Here I've done them a bit thinner than I usually do because I wanted multiple colors.      
  4. Once you have all your pieces cut, paint your base color on your nail. Here I've just used white. I forgot to show this part in the pictures. If you already had your nails painted from before and it's fully dry then just apply a clear coat over your color.
  5. Let your base color (or clear coat) dry most of the way but while it's still tacky, start laying down your strips. Because you are putting polish on top of polish it will adhere to the tacky polish underneath. Trim off the extra on the sides and make sure they are pressed down good. You can also clean up any leftover pieces that go over the sides or edge of the nail with a small brush and acetone just like you would with regular polish. Then apply a topcoat over everything and you're set!!


You can make anything with these, not just chevron! If you go to a craft store you can get heart hole punchers and stars, you can cut out shapes like triangles, anything you want!! You follow the exact same steps just change your tool! I hope this was helpful for some of you! I'd love to see what you come up with! Let me know if you try this out! Tag me on Instagram @lusterlacquer and use my hashtag #lusterlacquer in case I miss the name tag!


And here are mine and DJ's #bestietwinnails!!! Go follow her on Instagram @djsnails. She will be holding a contest/giveaway coming up!


xo, Colleen

Thursday, August 8, 2013

Polish My Life - Late Summer Creams & Dreams Collection 2013

Hi my sweets! Today I have some swatches from a brand new Indie polish line Polish My Life that will launch 8/16!!! I was really impressed with these and they are soooo pretty! This is the Late Summer Creams & Dreams Collection.


SHAMROCK SHAKE
Is a pale minty green with a subtle shimmer. You can't see the shimmer in the photo but this is such a pretty color. I'm still trying to figure out my lighting in our new place so this isn't capturing as pigmented as it is. It was a little streaky at first but it leveled out really nicely. I applied three thin coats and topcoat.


CREME DE LA BLUE
Is a soft baby blue color with a subtle shimmer. When this was on the nail it actually looked like a flake shimmer instead of microglitter shimmer. I don't know if that was my eyes playing tricks on me or what but it's gorgeous either way! This is three thin coats and topcoat. Was very easy to apply. Again a teeny bit streaky on the first coat but then leveled out.


LILAC LOVE CHILD
A very pale purple lilac with subtle shimmer. Very beautiful and soft. Again it's photographing lighter then it is but so so pretty! Three thin coats no topcoat. 


PARTY DRESS
Is a clear based glitter topper with hot pink microglitters, blue and silver hex's, and white stars! This is sooo stunning! I'd have to say this is my favorite from the collection! It's just so pretty and unique without being over the top. I feel like it's so versatile. You could wear this any time of the year and pair it with so many different things, like a good "party dress" :) Here I've applied one coat over Lilac Love Child and topcoat. Formula was great and the stars were quite easy to retrieve.


LIP SLIP
Another clear based glitter topper with hot pink microglitters, purple holographic hex's, and bright coral dot glitters! I just love these toppers Shaneka has created. They are so well done. Sometimes indie glitterbombs can be over the top and so "in your face" which I love too but sometimes it's nice to have something soft and delicate. I probably should have used a different base color though. Whoops! I didn't think it would match so closely till I put it on. Here is one coat of Lip Slip over Island Girl "Diamond Head Breeze" and topcoat. You can see though how versatile these are. If you want to amp them up throw on a vibrant base! And obviously you can layer more coats for a big glitter effect!


Full size polishes are a 15ml bottle and also feature a pro-wide brush that make application flawless! Shaneka, creator of Polish My Life Nail Lacquer really did everything right with this line. 


These polishes are really amazing! Formulas are great and the combinations are so so pretty. Make sure to mark your calendars for the launch on August 16 so you don't miss out on these beauties! These will be available for purchase at http://polishmylife.com/!!! And make sure to follow Polish My Life on Instagram for updates! Instagram: @polishmylife.

xo, Colleen


DISCLAIMER: These polishes were provided to me for the purpose of review. These are my 100% honest opinions. I was not compensated in any way nor am I affiliated with Polish My Life products.