Thursday, January 31, 2013

Monthly Mani Favorites (January)

It's January 31st which means it's time for MonthlyManiFavorites!!! I'd also like to wish my wonderful hubby a HAPPY BIRTHDAY!!!! He is at work tonight and I work all day tomorrow, sad! I miss him! Ok moving on. So I started the hashtag #monthlymanifavorites on Instagram so people could create a little collage to recap their favorite manis they had done for that month and hashtag it with #monthlymanifavorites. So here are my favorites!!!


First up, my abstract watercolor nails! I loved this!!! So fun, colorful, and funky. Click here to see the entire blog post along with instructions on this look!


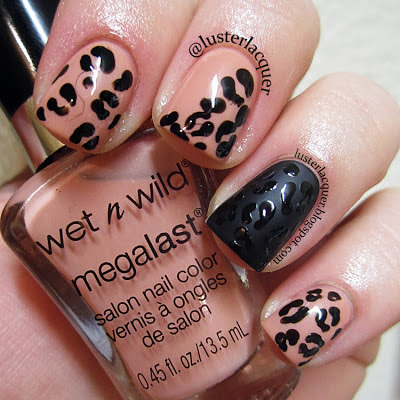
Next up was my leopard print nails. My first attempt at this wasn't very good so I did it again. Practice makes perfect right? I was really happy with how these turned out the second time around.


Then was my feather mani inspired by Kaitlin Ferland at The Daily Polish. Loooved these!! So delicate.


And last but certainly not least!! My cupcake nails for my birthday!!!! These were a huge hit on IG and really made my page take off!


Hope you guys like this idea of a montly recap and I hope you join in!!! #montlymanifavorites


xo, Colleen


Monday, January 28, 2013

OPI - Mariah Carey Liquid Sand (review & swatches)

Today I have swatches and reviews for the Mariah Carey Liquid Sand polishes from OPI. I bought the mini pack because I didn't think I would use them enough to buy full sizes, but we shall see! The Liquid Sands are a matte finish textured polish. Instructions say apply base coat and two coats of polish. Do NOT use top coat. So that's what I did.

These all applied very sheer on the first coat and I thought "oh no I'm going to have to put undies on" but on the second coat was completely opaque. The first coats also did not show true color. On the second coat it was like they shifted to their true color. Very strange. I love these polishes!! The formulas are great! My only dislike is that they kind of drag on fabrics, although they don't snag or pick up any fibers, it just feels rough. They aren't any harder to remove than regular glitter polishes which was my biggest concern. I did find when doing clean up around my cuticles though that if you're not careful it will pull off a whole section of polish because it all sticks together.


L-R: Get Your Number, Can't Let Go, The Impossible, Stay The Night


GET YOUR NUMBER... is medium blue with silver small and medium glitters that really catch the light and look holographic. Such a pretty color.

I tried as best I could to photograph the texture but I don't think I did it justice.


CAN'T LET GO... came off more cool toned in photos but is definitely a warm tone purple. This also had bigger hex glitters that made it more difficult to work with. It made my tips very uneven. I had to press against my nail edge with my finger to get it smooth.


I think I captured the texture a little bit better with this one.


THE IMPOSSIBLE... comes off more of an orange-y red on camera but is more of a magenta red in person. This one is soooo pretty! It has small and medium glitters. I think I'll be using this in a Valentine's Day look!


You can really see the texture in this one.


STAY THE NIGHT... is a black base packed with small red glitters. Absolutely amazing!! My favorite of the bunch and most reviews I've seen, this one is highly liked!


I wish I could capture the texture better! Stupid camera!


And here I've done a Mix-n-Match mani using Stay The Night on my accent finger. LOVE!!


I love these polishes. I think they're so unique and add an amazing element to any boring mani. I think the only one I would consider buying a full size of would be Stay The Night. I just don't think I would use the other ones enough.


xo, Colleen


Friday, January 25, 2013

My Week in Instagram Pictures

SATURDAY:
Nude leopard print. I definitely think my leopard skills could use some work. I love the colors of this. Been really into nudes lately. Parts of it are a little messy but I need to practice.


SUNDAY:
I tried it again. Haha. And I love how this one came out much better!!!!
Colors are Wet N Wild - Private Viewing and Orly - Liquid Vinyl. On the accent nail is NYC - Matte Me Crazy.


TUESDAY:
I posted my sponged watercolor base to my abstract nails. Click here to see the full blog post.
Colors Are: Sinful Colors - 24/7, Orly - Lemonade, Loreal - Club Prive, Lime Crime - Lavendairy.


WEDNESDAY:
Abstract nail art!!! Basically just lines, curves, and dots. I love this soooooo much!! I just used a black, white, and silver glitter striper. And then dotted some white and black dots. Click here to see the full blog post with step by step instructions.


xo, Colleen


Wednesday, January 23, 2013

Abstract Nail Art

Today's post is a really fun look!!!! Abstract nail art with a watercolor base!!!


WHAT YOU'LL NEED:

  • Your choice of nail polish. I think 4 is a good amount. Plus a base color.
  • Make-up sponge
  • Black, White, and Silver Glitter striper (or these polishes with a thin nail art brush)
  • Dotting tool (I used a ball point pen since I'm still waiting for my dotting tools to arrive)

STEP 1:
Apply a base coat if you like. I always wear OPI - Nail Envy. Then paint your nails an even coat of white or a pale cream color to make the colors we put on top more vibrant and opaque. I used Lime Crime - Milky Ways. Let it dry.


STEP 2:
Cut up a make-up sponge into four chunks or one for each color of nail polish you're using. On a piece of tin foil, or plastic bag, or palette (whatever you wanna use really) dab out a little polish to dip in. You'll want to do each color one at a time so that your blobs don't dry while you're working. Dab your sponge into the polish and then apply to your nail in your desired pattern moving from color to color and overlapping them to blend. You may have to go over the colors more than once. Once you've covered your nail give just a little bit of time to set, maybe a minute. Then apply a top coat or clear polish to blend all the colors evenly before it's completely dry.


Your nails will look like this when you're done. You have the option to tape off the skin around your nail if you don't want to get messy but for me it's just easier to do clean up. You'll have to do some no matter what.


STEP 3:
Clean up. I use a small ELF concealer brush dipped in pure acetone to clean around my cuticles. I like to do this before I start the nail art so that my base colors have time to dry and so I can see exactly where my art is going.

COLORS USED:
Sinful Colors - 24/7, Orly - Lemonade, Loreal - Club Prive, Lime Crime - Lavendairy

STEP 5:
Add your abstract nail art! Basically just lines, curves, and dots. I couldn't do this step by step because each nail is different and I can't photograph myself doing it lol, it's really whatever you want. Take my design as a template and make it how you want! Then finish everything off with a topcoat! 


I hope you guys enjoyed this as much as I did!!! I LOOOVE these nails!! There's really no right or wrong way. So bright and fun!! 

xo, Colleen


Instagram: @lusterlacquer
Kik: @lusterlacquer
www.facebook.com/LusterLacquer


Friday, January 18, 2013

My Week in Instagram Pictures

I've decided to start a series called "My Week in Instagram Pictures". It will be a new post every Friday to recap all my nail posts on Instagram. This is a way to feature all the nails I've done for that week if I haven't done a separate blog post on them.


SUNDAY:
Birthday Cupcake Nails!!! Posted these up on Sunday because my birthday was Monday!! I'm 26 now!! Woah. I thought these turned out soooo cute and they were a turning point for my account! The amazing YoungWildandPolished featured these nails on her page and my feed EXPLODED!! Thanks so much hun! I used mostly Lime Crime polishes and I got asked sooo many times what the purple one is. It is Lime Crime - Lavendairy with a coat of INM - Northern Lights on top. If you have a question about any other colors please leave a comment!


TUESDAY:
My Zoya three free offer order came in the mail on Monday so I did all the swatches (plus 2 extra that I got for my birthday) on Tuesday. Click the link to see the complete blog post.


WEDNESDAY:
I did SUUUUPER cute feather nails inspired by the amazing Kaitlin Ferland!! Her nails are amazing!!! You should follow her! Polishes I used were Sally Hansen - Breezy Blue and Orly - Decades of Dysfunction. And then just a white and silver striper for the feathers.


FRIDAY:
I did a really simple but oh so pretty glitter gradient. Polishes are JulieG - 9to5 and Essie - Stroke of Brilliance.


Let me know if you guys like this idea of a weekly recap!!!


xo, Colleen


Instagram: @lusterlacquer
Kik: @lusterlacquer
ManiDiaries: @lusterlacquer


Tuesday, January 15, 2013

Zoya Three Free Offer....plus 2

Hi guys!! I'm back!! Hope every had a great holiday season!! Now let's get down to business!! I'll be reviewing some Zoya nail polishes today. From January 7 -13 Zoya was running an offer for three free polishes just had to pay shipping. Zoya polishes run at $8 a piece so this was a great deal! Wasn't about to pass it up. Shipping was only $10. Here are the three that I ordered.


L-R: Zuza, Ali, Maisie


Zuza is a turquoise with gold and silver metallic shimmer and has a foil-like finish. It is rated as Intensity 5 which I would agree. I applied 2 coats but you could get it completely opaque in one coat.


Ali is a very bright neon hot pink creme. Rated Intensity 5 which I agree. Completely opaque in one coat although I applied two. 
Kind of an OCD thing for me. Haha.


Maisie is a fleck topcoat with blue and green flakies in a sheer turquoise base. Don't know what it's Intensity is, it's no longer on the website. But I would imagine 1 or 2. The base is sheer enough that it doesn't really change the color of what undie you're wearing. Here is one heavy coat of Maisie over OPI - Russian Navy.


Now the next two polishes were given to me as birthday presents from my mother in law (my birthday was yesterday) but I decided to go ahead and include them in this post. Sorry for the crappy photo. Could not capture these at all.


Julie is from the Spring 2013 Lovely Collection. It is a soft metallic purple with a subtle shimmer. Rated Intensity 5. I would say more of a 4. Definitely two coats to get opaque (I wanted to do 3). This is a gorgeous color but so hard to photograph!!


Neely is also from the Spring 2013 Lovely Collection. It is a dusty mint green in a glossy creme finish. Very pretty, feminine shade described as "a fun color in a muted finish gives a cool vintage edge to your look." -Zoya
2 coats


Sorry I've been gone for so long. I will definitely be updating more! Hope you enjoyed these reviews and maybe you see something you like!!


xo, Colleen


Instagram: @lusterlacquer
Kik: @lusterlacquer