Saturday, August 10, 2013

How To: DIY chevron decals + Neon Overload!

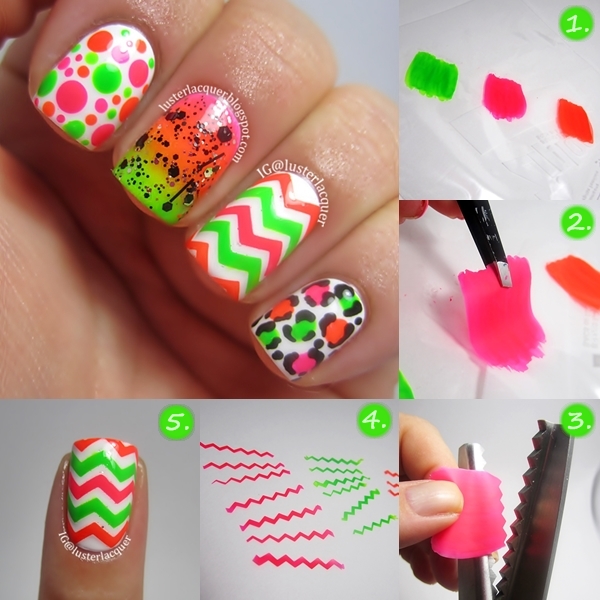
Hi dolls! Today we have a bit of a smorgasbord going on! We've got dots, gradients, glitter, chevron, leopard, zebra! What DON'T we have on these nails! Haha. Well, me and DJ of @djsnails on Instagram teamed up again for #bestietwinnails! While I was in Las Vegas last month I bought us some of the same Island Girl Polishes and when I sent them to her I suggested we do matching nails using them! She basically had full reign on this one! She picked the colors and design and I copied lol.

I used:
Island Girl: "Aloha Girl" "Mohalo Color" and "Sugar Cane" (although I'm pretty sure it's labeled wrong).

Don't worry the decal tutorial is coming! Now usually when I do a chevron design I just paint my base color, let it dry, cut tape, apply it directly to my nail and paint my coordinating color over it then peel it off to reveal the chevron design. But, when I want multiple different colors in my design, that becomes kind of a struggle because if you don't work fast enough with all your colors they start to dry over the tape, then when you peel off your tape your top polishes come right off with it. So then I turn to the Ziploc Method. I did not create this and I have no idea who the originator was.


How To: DIY chevron decals


  1. Paint the color(s) of your choice in big enough sections for however many decals you will need, on a Ziploc (sandwich) baggy and let it dry for a good few hours. Do enough coats so that it is opaque. Here I've done three coats of each color. What I like to do is do it the night before and let it dry overnight. If you need to speed up the process you can also stick it in your fridge and it will dry faster.
  2. When your polish is dry, lift up the edges with tweezers or an orangewood stick. Something pointy that can lift the edges then it should peel right off.
  3. Using your pinking shears or craft scissors, start cutting your strips. You can do them as thin or wide as you want. Here I've done them a bit thinner than I usually do because I wanted multiple colors.      
  4. Once you have all your pieces cut, paint your base color on your nail. Here I've just used white. I forgot to show this part in the pictures. If you already had your nails painted from before and it's fully dry then just apply a clear coat over your color.
  5. Let your base color (or clear coat) dry most of the way but while it's still tacky, start laying down your strips. Because you are putting polish on top of polish it will adhere to the tacky polish underneath. Trim off the extra on the sides and make sure they are pressed down good. You can also clean up any leftover pieces that go over the sides or edge of the nail with a small brush and acetone just like you would with regular polish. Then apply a topcoat over everything and you're set!!


You can make anything with these, not just chevron! If you go to a craft store you can get heart hole punchers and stars, you can cut out shapes like triangles, anything you want!! You follow the exact same steps just change your tool! I hope this was helpful for some of you! I'd love to see what you come up with! Let me know if you try this out! Tag me on Instagram @lusterlacquer and use my hashtag #lusterlacquer in case I miss the name tag!


And here are mine and DJ's #bestietwinnails!!! Go follow her on Instagram @djsnails. She will be holding a contest/giveaway coming up!


xo, Colleen

Thursday, August 8, 2013

Polish My Life - Late Summer Creams & Dreams Collection 2013

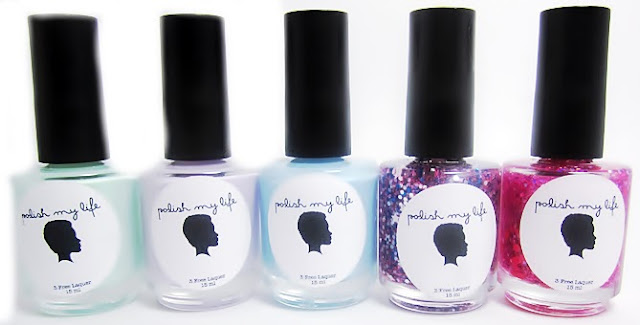
Hi my sweets! Today I have some swatches from a brand new Indie polish line Polish My Life that will launch 8/16!!! I was really impressed with these and they are soooo pretty! This is the Late Summer Creams & Dreams Collection.


SHAMROCK SHAKE
Is a pale minty green with a subtle shimmer. You can't see the shimmer in the photo but this is such a pretty color. I'm still trying to figure out my lighting in our new place so this isn't capturing as pigmented as it is. It was a little streaky at first but it leveled out really nicely. I applied three thin coats and topcoat.


CREME DE LA BLUE
Is a soft baby blue color with a subtle shimmer. When this was on the nail it actually looked like a flake shimmer instead of microglitter shimmer. I don't know if that was my eyes playing tricks on me or what but it's gorgeous either way! This is three thin coats and topcoat. Was very easy to apply. Again a teeny bit streaky on the first coat but then leveled out.


LILAC LOVE CHILD
A very pale purple lilac with subtle shimmer. Very beautiful and soft. Again it's photographing lighter then it is but so so pretty! Three thin coats no topcoat. 


PARTY DRESS
Is a clear based glitter topper with hot pink microglitters, blue and silver hex's, and white stars! This is sooo stunning! I'd have to say this is my favorite from the collection! It's just so pretty and unique without being over the top. I feel like it's so versatile. You could wear this any time of the year and pair it with so many different things, like a good "party dress" :) Here I've applied one coat over Lilac Love Child and topcoat. Formula was great and the stars were quite easy to retrieve.


LIP SLIP
Another clear based glitter topper with hot pink microglitters, purple holographic hex's, and bright coral dot glitters! I just love these toppers Shaneka has created. They are so well done. Sometimes indie glitterbombs can be over the top and so "in your face" which I love too but sometimes it's nice to have something soft and delicate. I probably should have used a different base color though. Whoops! I didn't think it would match so closely till I put it on. Here is one coat of Lip Slip over Island Girl "Diamond Head Breeze" and topcoat. You can see though how versatile these are. If you want to amp them up throw on a vibrant base! And obviously you can layer more coats for a big glitter effect!


Full size polishes are a 15ml bottle and also feature a pro-wide brush that make application flawless! Shaneka, creator of Polish My Life Nail Lacquer really did everything right with this line. 


These polishes are really amazing! Formulas are great and the combinations are so so pretty. Make sure to mark your calendars for the launch on August 16 so you don't miss out on these beauties! These will be available for purchase at http://polishmylife.com/!!! And make sure to follow Polish My Life on Instagram for updates! Instagram: @polishmylife.

xo, Colleen


DISCLAIMER: These polishes were provided to me for the purpose of review. These are my 100% honest opinions. I was not compensated in any way nor am I affiliated with Polish My Life products.

Wednesday, August 7, 2013

Little Whale Blue

Hi lovelies! Today I bring you this fun summer/beachy/ocean mani! Colour Gossip Nail Lacquer was kind enough to send me their new 50 Shades of Blue Collection. I haven't had time to swatch them individually yet but I was able to put this look together using all 6 shades!


L-R: Icy Blue, Clean Slate, Patriotic Blue, Royal Pain, Royal Baby, Blue Velvet


I did a gradient using Icy Blue and Clean Slate on my index finger. Then I used Patriotic Blue as my base on my middle finger and stamped this cute little whale using plate W108 from Winstonia using Icy Blue again. Which I still suck at stamping. Lol. Then I used Royal Pain as my base on my ring finger and topped it with Royal Baby, a beautiful blue flake coat. Then I put Blue Velvet on the pinky! I love all these colors together!


Keep an eye out for individual swatches coming in the next couple weeks!

xo, Colleen

Monday, August 5, 2013

Neon Leopard Print

So I was swatching some of the Island Girl polishes I got on my trip and when I got to this color I didn't want to take it off! This is "Sugar Cane" from Island Girl (although I have a green that is also called "Sugar Cane"). What the heck Island Girl? You're bottles are always mislabeled! Anywho, this is one coat over white. ONE COAT! *go ahead, do a double take*

Well of course I had to add something to it, so I did cheetah/leopard print (what's the difference?) *i don't really care so don't leave me a big long lecture on it* And then I threw on a matte topcoat for the heck of it. But I am loving this! Can't stop staring! The brightness just sucks me in!


I feel like a superhero walking around with glowing rays coming out of my fingertips. *LusterLacquer alter-ego in full force* haha

xo, Colleen

Saturday, August 3, 2013

Doctor Lacquer Review & Swatches


Today I have swatches and a review of some polishes from Doctor Lacquer!! Three from the Go Tropical Collection and one from the Summer Neons Collection.


DRAGONFRUIT
Is a UV color changing polish. Creamy gray in shade and then purple in the sun! Applies amazing! Formula on all of these is pretty perfect. And retrieving glitters is no problem at all. Here I have three coats over white on my ring finger and the rest are three coats on it's own.


SOURSOP
Is another UV color changing polish. Goes from a pistachio green crelly in the shade to a dusty purple in the sun. Again, applies beautifully. Here I have two coats over white.


POMELO
Changes from white in the shade to pink in the sun! I think at the time that I photographed this one the sun must have been hiding behind a cloud because it did not get as strong of pink as I've seen. Here I have two coats over white. Again application was perfect. 


NEON RAIN
Is a glitterbomb topper with neon pink, neon blue, and neon green multisized glitters in a clear base. Application was great!!! Here is two coats over OPI "Eurso Euro". And on the ring finger I did a chevron design with China Glaze "Shocking Pink" and Island Girl "Sugar Cane".


And here is Neon Rain in regular lighting and under blacklight!


These are probably some of the most perfect glitter/crelly formulas I've seen. So easy to work with. And who doesn't love color changing polish?! Head on over to http://doctorlacquer.storenvy.com/ to purchase some of these beauties!

xo, Colleen


DISCLAIMER: These polishes were sent to for the purpose of review/swatch. These are my 100% honest opinions. I was not compensated in any way, nor am I affiliated with Doctor Lacquer products.

Friday, August 2, 2013

Back to School Mani!

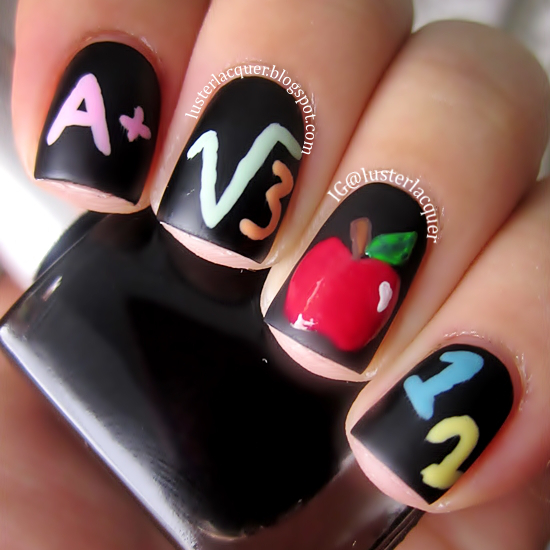
It's about that time! School is right around the corner for a lot of you! (SO glad I'm done with that sh*t). I thought I would do some school inspired nails for you today! I've seen this basic design done a few times before so I can not take any credit for coming up with this, but it's so cute! Chalkboard nails! literally (not the blogger) hehe.

My base is Colour Gossip Nail Lacquer "Rumors" all mattified. And then the varying colors are Lime Crime "Parfait Day", "PeachesCream" and "Crema de Limon", Sally Hansen "Mint Sorbet", and Colour Gossip "All About Me". And then topped everything off again with matte topcoat. For the apple I used NYC "Times Square", NYC "Brownstone" and Colour Gossip "City Chic" for the stem, and Island Girl "Sugar Cane" and Colour Gossip "Nature Girl" for the leaf. And I left the apple glossy. Whew....I think I got everything! Yikes! (And I say AND way too much!)


I wish every one a great school year! Or if you're headed off to college, have the time of your life! But be smart and safe too :)

xo, Colleen

Thursday, August 1, 2013

Neon Orange Stripes

Orange is probably my least favorite color next to purple. Haha I know, you're all thinking I'm crazy. But for some reason lately I've just been dying for some orange nails! I don't know what the deal is. So today I did a simple striping look. At first I wasn't too into it but now I'm loving it. Orange can be very strong and like "BAM in your face!" but I think I did something that still shows it off but tones it down.

I used two new Island Girl colors that I picked up while I was in Vegas. "Pineapple Plantation" the white and "Aloha Girl" the orange. And then added some small rhinestones for that finishing touch.


I have kind of been lacking in creativity since my hiatus. Do you guys have any requests or certain designs you'd like to see me do? I'll do my best!

xo, Colleen